Ingredients:
Myths & Magic designer series paper by Stampin’ Up
Magical Day stamp set by Stampin’ Up
Tailored Tag Punch
Corner Rounder Punch
Layering Circles Framelits
Basic Black Archival ink
Lemon Lime Twist ink
Whisper White card stock
Metallic Enamel shapes
Brother Scan N’ Cut
Sponge or Sponge Dauber
Bone Folder
Dimensionals or other Foam Adhesives
Hot Glue
Big Shot
4 oz White Paper Hot Cups with Lids
Mini Coffee Cup Dies
Paper straw
Paper piercing tool
Tacky glue
Hampton Art AWS012 Action Wobble Spring, 12-Pack
Recipe:
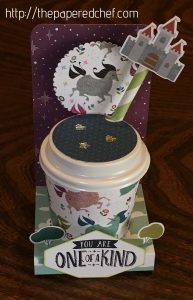
Using the Big Shot, cut the coffee cup cover from the Myths & Magic designer series paper. Because this paper is so thick, it’s recommended that you use a bone folder to loosen the fibers of the paper. This will help curl the paper and help it stay attached. Attach the unicorn paper to the cup using hot glue. Cut out a circle for the lid of the coffee cup using the Layering Circles framelits. Attach it to the cup with foam adhesives. Embellish the top of the cup with Metallic Enamel shapes. Add a paper straw. Attach a castle to the top of the straw using foam adhesives. The castle was cut out with an outline distance of 0.4″ using the Brother Scan N’ Cut (see Cutting out Dragons, Knights & Castles with the Brother Scan N’ Cut – Myths & Magic DSP).
To create a single coffee cup holder, cut a 11” by 2.75” piece of Myths & Magic dsp. Then turn horizontally and score at 5”. 7.5”, 8” and 10.5”. Keep in mind which way you would like the pattern to show before scoring it. Round the top corners with a Corner Rounder punch. Use a scalloped circle die from the Layering Circles dies to make the opening to hold the cup. Use the remainder to cover the lid of the cup. Save the shape to use on another project. Use the same circle to cut out a unicorn for the top of the holder. Attach the unicorn embellishment to a wobble spring (Hampton Art AWS012 Action Wobble Spring, 12-Pack). This makes your project 3D and interactive. Add little trees using a paper piercer to make holes. Then, glue the base into the hole with tacky glue. The trees were cut out with an outline distance of 0.4″ using the Brother Scan N’ Cut.
Stamp the sentiment from the Magical Day stamp set onto Whisper White card stock using Basic Black archival ink. Use the Tailored Tag punch to cut out the sentiment. Trim a little off the bottom to make the shape flat, not pointy on the bottom. Use a sponge to add Lemon Lime ink around the edges. Adhere the sentiment to the front of the holder using foam adhesives.
The Myths & Magic suite of products was released in the Occasions 2018 catalog on January 3rd. You can earn FREE products during Sale-A-Bration just by spending $50 or more at my store. Please visit the link below for more details and please use the host code on my page for another special treat. http://paperedchef.stampinup.net

Item Number: 145857

Item Number: 145600
The Papered Chef Recommends:


Related Posts:
Knights & Castles Ritter Sport Treats – Myths & Magic
Cutting out Dragons, Knights & Castles with the Brother Scan N’ Cut – Myths & Magic DSP
Magical Mickey & Friends Treats


